
 Jane and John's RV pages
We add a roof top AC unit
Page 1
On to page 2 | page 3 | page 4
Our basement air is rated at two tons, or 24,000 BTU and provides adequate cooling (and heating above freezing air temps) for us in outside air temperatures of up to about the mid to high 80s if we are in full sun. While others have reported being able to cool their interior down to about 20 degrees below outside ambient air temperatures, the best we usually manage is about a 10-12 degree delta in the hottest part of the day. For example: it's 4pm, it's 90 degrees out, our AC is on high blower, been running constantly since lunch, and our interior is maybe 80 degrees. Yes, the AC is running fine and we started out the day with the coach interior at about 73 degrees and deploy the MCD day shades about lunch time.
My theory is there is just too much heat gain in the coach for 24,000 BTU's to keep up. I have measured the inside temp of the walls and the temps can range from the low 80s to high 80s with the wall in full sun and outside temps of low 90s. I will say the roof is well insulated with about 3" of Styrofoam.
What to do about the problem?
Add more cooling BTU's (13,500 to be exact) by replacing the Fantastic Fan galley vent with a roof AC unit.
The concept of replacing the galley Fantastic Fan with a roof air unit I must confess is not my original thought, others have gone before me but as far as I can tell, nobody else has documented the process. Roof airs use the standard 14" x 14" opening (like the vent fans), so the roof opening was ready-made and took the stress out of making a new hole.
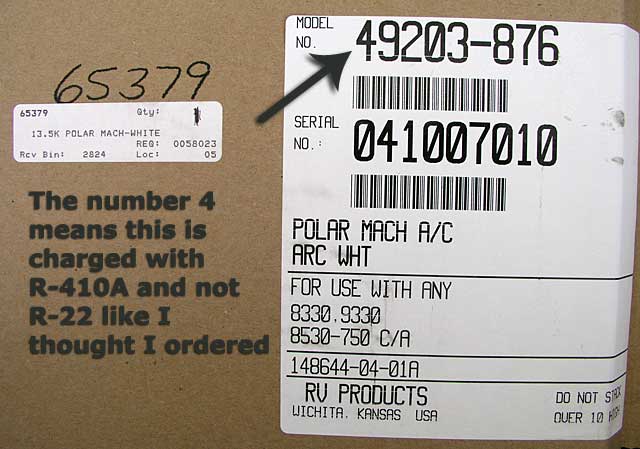
Since RVP (Coleman-Mach) has been very good to us by previously replacing our entire basement AC unit due to intermittent problems, the only product choice for us was to stick by our old friends, RVP. I chose the Coleman-Mach Polar Mach low profile 13,500 BTU unit model number 9203 and ordered it by phone from PPL Motorhomes. At least I thought I ordered the 9203. The 9203 is an older model that uses R-22 refrigerant, the newer model number is number 49203 and it uses R-410A and uses about another amp of electricity.
In spite of being extremely explicit on the phone with Felicia at PPL Motorhomes parts department about what I wanted, this is what I got. I sent her an email asking her to have a PPL manager call me - I'm still waiting. PPL will now be last on my list of vendors with which to do business
Rant-ON> We're 'protecting' the environment with a friendlier Freon product, but the unit is less efficient as in it uses more electricity so more coal/oil/gas/whatever is burned to produce more energy to run the unit. I don't get it. <Rant-OFF
While contemplating the project, I double checked the dimensions of the outside unit and the inside ceiling assembly to be sure there would be no interference issues, and as you might have surmised, there were none.
Project challenges..
Two major ones to overcome. The most significant issue to overcome is how to safely move the 95 pound roof unit from the ground to the roof. Two strapping young guys on two ladders? Helicopter? Star Trek Transporter? Your local Camping World? Loader? Fork lift?
The very best solution if you want to DIY is to rent a fork lift with telescoping forks. You can put the unit on the forks, raise it up, telescope the forks to the roof. Use a blanket to move/pull the unit in place. My original solution was going to be using my Kubota loader bucket to raise the unit up as high possible, and then pull it along a couple of planks to the roof. That idea while workable seemed a little scary to me.
Long story short - I bought a used Genie scissor lift from an Internet auction. I could use it around the shop and use it for maintenance on the coach, so it was pretty easy to justify the purchase. The Genie lift worked out quite well; although a fork lift would have been ideal, I didn't have a lot of use for a fork lift if I bought one.
Challenge number the second. Power. How to get 12/2 with ground from a power source to the unit in the ceiling. Two possibilities. There is a 12 gauge power appearance in the OnePlace center - our Horizon has an engine block heater electrical outlet in the electrical bay which is operated via a switch at the top of the OnePlace center. The outlet is fed by 12 gauge wire which would meet the requirements for the Polar Mach AC. I could not tell if this circuit had a separate breaker, but I didn't investigate it very much since I was going to run new wiring and add a circuit breaker.
The electric breaker box is located at the foot of the bed, so I had to run wire from the box to the bottom of the OnePlace panel, up that column, through the ceiling to the 14" x 14" roof opening. The wiring story is best told in pictures, so more on this later.
Logical order of the project
Here's the basic project order I followed:
Survey and plan:
choose an appropriate roof air unit that will fit your space, both for roof area clearance and ceiling clearance. I recommend a unit that will have a fairly low current draw like the model 9203
plan for electric
Collect components:
order the AC unit and ceiling assembly, buy wire, circuit breaker if necessary, rent equipment as necessary
Start the job:
first thing I did was run the new 12/2 w/ground from the breaker panel to the top of the OnePlace column
remove inside Fantastic Fan trim, tag yellow/white and yellow/yellow wires, cut wires
fish wires from a hole you cut in the ceiling area of the OnePlace center to the side of the 14" x 14" opening. If you want to relocate the Fantastic Fan, plan for extending that wiring (you can run it through the ceiling duct)
set up the outside part of the job - be ready to move the AC unit to the roof
remove Fantastic Fan (use a flat razor knife to scrape up the Dicor sealant to expose the many screws)
scrape the roof clean with a razor the area around the opening, wipe down with acetone
position the Polar Mach (or whatever) roof unit over the opening and be certain the condenser coils face aft (use gloves - the edges are sharp) - have a helper tell you when the square gasket matches the 14" x 14" opening. You can scoot the unit around from the inside when you are bolting it down
bolt down the roof unit and tighten the four long bolts through the inside metal mounting frame until the colored 'tabs' you can see on the inside of the gasket compress and meet the roof (it will make more sense when you get to this point)
hook up electric to the ceiling assembly, plug in the roof unit wiring harness to the ceiling assembly
screw the ceiling assembly to the mounting frame
turn it on and enjoy your cold air!
On page 2 we start with the project pictures