
 Jane and John's RV pages
We finally kiss the one-thirds goodbye!
Hello Garnet SeeLevel tank monitor system
>Page 4 - we test and finish up sensor strip installation
Let's get the SeeLevel sensor strips taped in place temporarily and hook up the display to see if it's going to work (of course it is!!) After a sanity check that it will work, time to make everything permanent. If you haven't done it yet, get your nose into the SeeLevel Shop Manual before you go any further! Remember, I am leaving out some details and just covering the Winnebago mechanical and electrical particulars. For example, you should test the sensor signal power after temporarily taping it into position (Chapter seven of the manual.)
Since our gray/black tanks are fairly short, I had to cut our strips down to 7 1/2" and I oriented the strips to where they would be closer to the top since the concern is being as accurate as possible when the tank fills up. Note: the strips can only be cut in certain places! Please read the Shop Manual carefully about 'programming' the sensor strips! You will cut one small tab to identify the sensor strip for the black tank, you cut another tab to id the strip for the gray tank, and unless you are 'stacking sensor strips (which I will not cover), you cut nothing for the sensor strip for the fresh water tank - you use it like it came (unless you have to shorten it of course.)
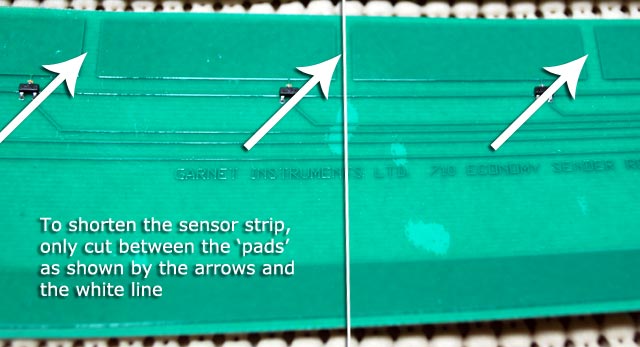
And to add to the text in the picture, cut at a 90 degree angle (if you need to cut down a sensor - we used the entire 12" strip for the fresh water tank.)
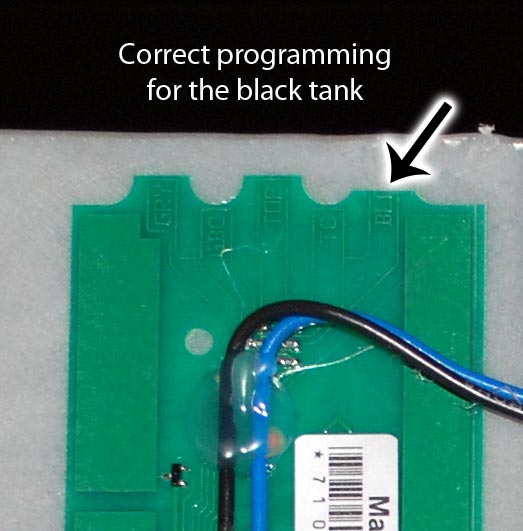
Not too difficult to figure out - cut the 'tab' on the right for the black tank or cut the 'tab' on the left for the gray tank.

To improve my 'comfort level' before permanent installation, I lashed everything up and gave it a test drive. If you look at the larger version of this picture, you might be able to make out the 81% reading on the display (toward the bottom left of the picture.) Yea! It all worked so I can get busy with the permanent install.
I think a good sequence of events here is to first get the sensor strips stuck down permanently. Buff up and flatten the tank wall with 220 grit sandpaper on a flat block of wood, then clean with acetone. Garnet recommends acetone due to the fact it doesn't leave a residue but if you read the manual, you would already know this ;-) Cut the sensor strip down to the appropriate height, figure out exactly where you want to place the sensor and then pull back a couple of inches of the tape covering the adhesive (I recommend starting with the bottom and work your way up), align the bottom of the sensor strip perpendicular to the tank wall, and stick just a little of the sensor to the tank (maybe 1/2".) Note: I DO NOT recommend pulling the entire paper strip covering the adhesive and trying to stick the entire strip down at one time! This is a recipe for disaster!
After you have a little of the sensor strip stuck to the bottom (or you can start from the top and work down - not a big deal) and you are satisfied with the sensor alignment, firmly press the exposed adhesive (only about 1/2" at this time) to the tank and then pull a couple of inches of the paper tape and press the adhesive against the tank, and keep repeating until you have the entire strip firmly attached to the tank wall.
You won't have the luxury of sticking a little of the sensor strip down at a time when you do the fresh water tank due to very tight clearances, but I have a method for you that works darn well - we'll cover that in page six.
After you get the sensor strips installed, time to do the wiring. (I much prefer soldering to crimp connectors, but crimp connectors will work okay. Be sure to use the correct size connector for your wire gauge and always test your connections by gently tugging on the wires after you make a crimp.) Refer to the SeeLevel Shop Manual, but this is dirt-simple:
Garnet wire Winnie wiring (outside monitor colors)
(display wiring
harness)
Red..............................Black (+12V)
Black............................White (ground)
Blue..............................Red (sensor lead)
Green............................Not used for the outside monitor (LP tank sender)
Sensor wires
Blue...............................Blue of the Garnet wire harness
Black..............................Black
of the Garnet wire harness

Best wiring practices include protection from chafe and keeping the wires secured
Page 1 - project introduction
Page 2 - pictures of the 'special tools' and jigs I used, picture of the Garnet system, disassembly of the plumbing bay part 1
Page 3 - we finish disassembly of the plumbing bay and look at wiring
>Page 4 - we test and finish up sensor strip installation
Page 5 - building a bezel for the outside display, finishing up the outside
Page 6 - access to the fresh water tank, installing the sensor strips on the tank wall, sensor wiring
Page 7 - we start installing the inside display, removal of the old display board & switches, cutting off the solar panel part of the old circuit board (optional), cutting an opening in the OnePlace steel panel for the new display
Page 8 - Wiring and project wrap-up